

Updated November 2026 · Anna Omni, art & fashion photographer and visual creator
The short version: it is not either-or. Dodge and burn is the main tool for shape and uneven tone. Frequency separation is a spot tool for colour patches, shine and blotches that are hard to fix any other way. Cleanup with the healing tools comes before both.
Many high-end retouchers use all three, in that order. This guide explains what each method does, gives the exact steps in Adobe Photoshop, compares them point by point, and shows where AI retouching fits. No prices here; they change too often.
The short answer: which method for which problem
- Spots, stray hairs, dust: healing and cloning. Neither of the two methods.
- Uneven tone, small dark and light patches, bumps: dodge and burn.
- Shape of the face and body, light direction: dodge and burn with a larger brush.
- Colour blotches, redness, a hot spot of shine, a harsh shadow edge: frequency separation, on a small area.
- Damaged texture in one place: frequency separation, cloning on the texture layer.
What each method does, in plain words
Frequency separation
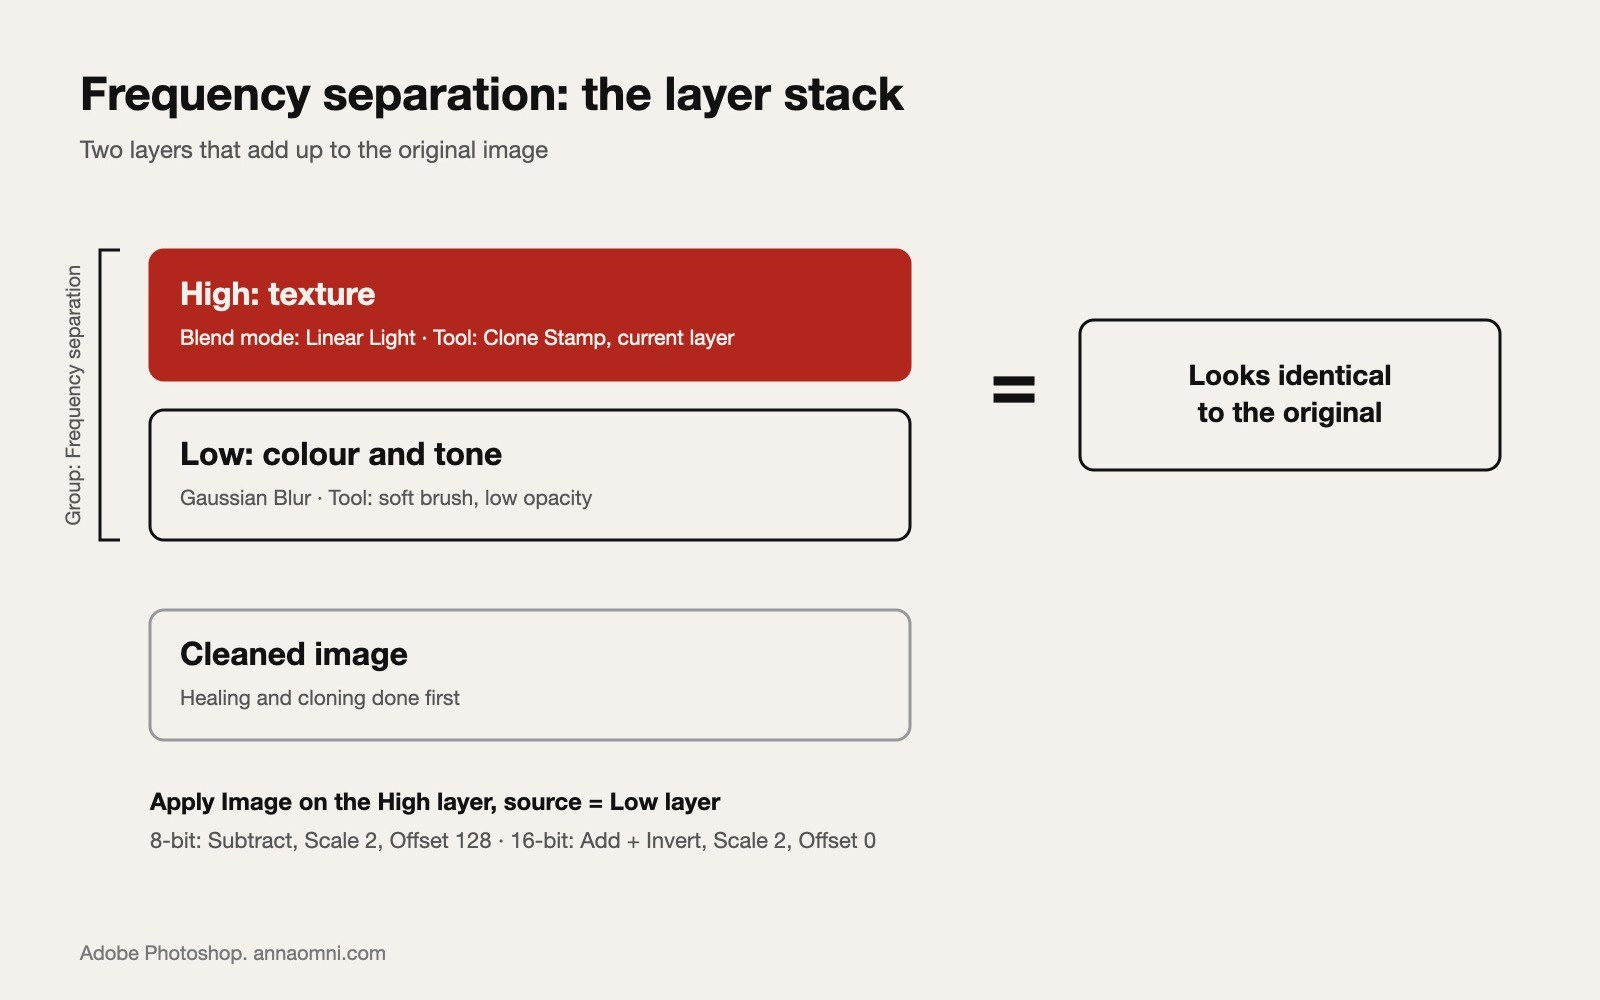
Frequency separation splits the image into two layers. The low layer holds colour and soft tone transitions. The high layer holds fine detail: pores, hairs, fabric weave. Together they look exactly like the original.
You can edit one without touching the other: even out a red patch on the low layer, and the pores above it stay as they were.
Dodge and burn
Dodging lightens, burning darkens. Skin looks uneven because of small differences in brightness. A blemish is often just a dark dot next to a light one. Lighten the dark and darken the light, and the area reads as smooth.
Nothing is blurred or copied, so all texture stays. That is why the method has the best reputation for realism, and why it is slow.
Frequency separation in Photoshop: steps
- Finish the basic cleanup first. Then create two copies of the image on top of the stack. Name the lower one Low and the upper one High.
- Hide High. Select Low and choose Filter > Blur > Gaussian Blur. Raise the radius until pores just disappear and shapes are still clear. Adobe’s own walkthrough uses 5 pixels as an example. The right value depends on the resolution and on how large the face is in the frame.
- Show and select High. Choose Image > Apply Image. Set Layer to Low.
8-bit file: Blending Subtract, Scale 2, Offset 128.
16-bit file: tick Invert, Blending Add, Scale 2, Offset 0. - Set the blend mode of High to Linear Light. The image should now look identical to the version before the split. Group the two layers and toggle the group to check.
- Work on Low for colour and tone: a soft brush at low opacity on an empty layer above Low, or a small lasso selection with a light blur.
- Work on High for texture: the Clone Stamp set to sample the current layer only.
Record the steps as two actions, for 8-bit and 16-bit. Retouch4me also offers a free Frequency Separation tool for Photoshop.
Dodge and burn in Photoshop: steps
There are two common non-destructive setups.
Two Curves layers
- Add a Curves adjustment layer. Pull the middle of the curve up slightly. Name it Dodge.
- Invert its mask to black (Cmd/Ctrl+I).
- Add a second Curves layer, pull the middle down slightly, name it Burn, and invert its mask.
- Paint with white on the masks, using a soft brush at very low flow or opacity, in single digits. Build up slowly.
One 50% grey layer
- Choose Layer > New > Layer. Set Mode to Soft Light or Overlay and tick the option to fill with the neutral 50% grey.
- Paint with white to lighten and black to darken, again at low flow.
Soft Light is gentler; Overlay is stronger.
Check layers
Small tone differences are hard to see in colour. A temporary group of helper layers on top helps:
- A layer filled with 50% grey in Color blend mode. It removes colour, so you see brightness only.
- A Curves layer with extra contrast above it. It exaggerates every patch.
Switch the group off often and hide it before export. A plain Black & White adjustment can mislead: red areas look darker than they are, and you end up dodging what only needed a colour fix.
Burning can add saturation and dodging can remove it. Correct this with a Hue/Saturation layer clipped to the Curves layer. A pen tablet such as a Wacom Intuos Pro makes this kind of brushwork far easier than a mouse.
Frequency separation vs dodge and burn: point by point
- Texture. Dodge and burn keeps all of it. Frequency separation keeps it only while you stay off heavy blurring on the low layer and careless cloning on the high one.
- Speed. Frequency separation is faster for one local problem. Dodge and burn is slower across a whole face.
- Control. Dodge and burn works stroke by stroke and is easy to undo in part. Frequency separation changes larger areas at once.
- Risk of plastic skin. Low with dodge and burn; the usual failure is blotchiness instead. High with frequency separation when the low layer is smoothed too much.
- Learning curve. Frequency separation gives a visible result on day one. Dodge and burn needs weeks of practice to see what to paint.
- Large prints. Over-smoothed tone under sharp pores reads as waxy at print size. Uneven dodge and burn shows as cloudy patches. Check both at 100% and zoomed out.
- Colour problems. Frequency separation wins. Dodge and burn changes brightness, not hue.
Is frequency separation bad?
No. It is criticised for how it is often used: split the image, then smooth the whole low layer with a blur or a Mixer Brush. The natural transitions of light across the face disappear. The pores stay, but they sit on a flat surface. This is the “plastic” look.
How to avoid it:
- Pick the radius with care. Too low, and tone problems stay in the high layer where you cannot fix them. Too high, and texture leaks into the low layer and gets smeared.
- Treat small areas. One patch, one edge, one hot spot. Never blur or mix the whole low layer.
- Keep the form. Cheekbones, the bridge of the nose and the jaw need their gradients.
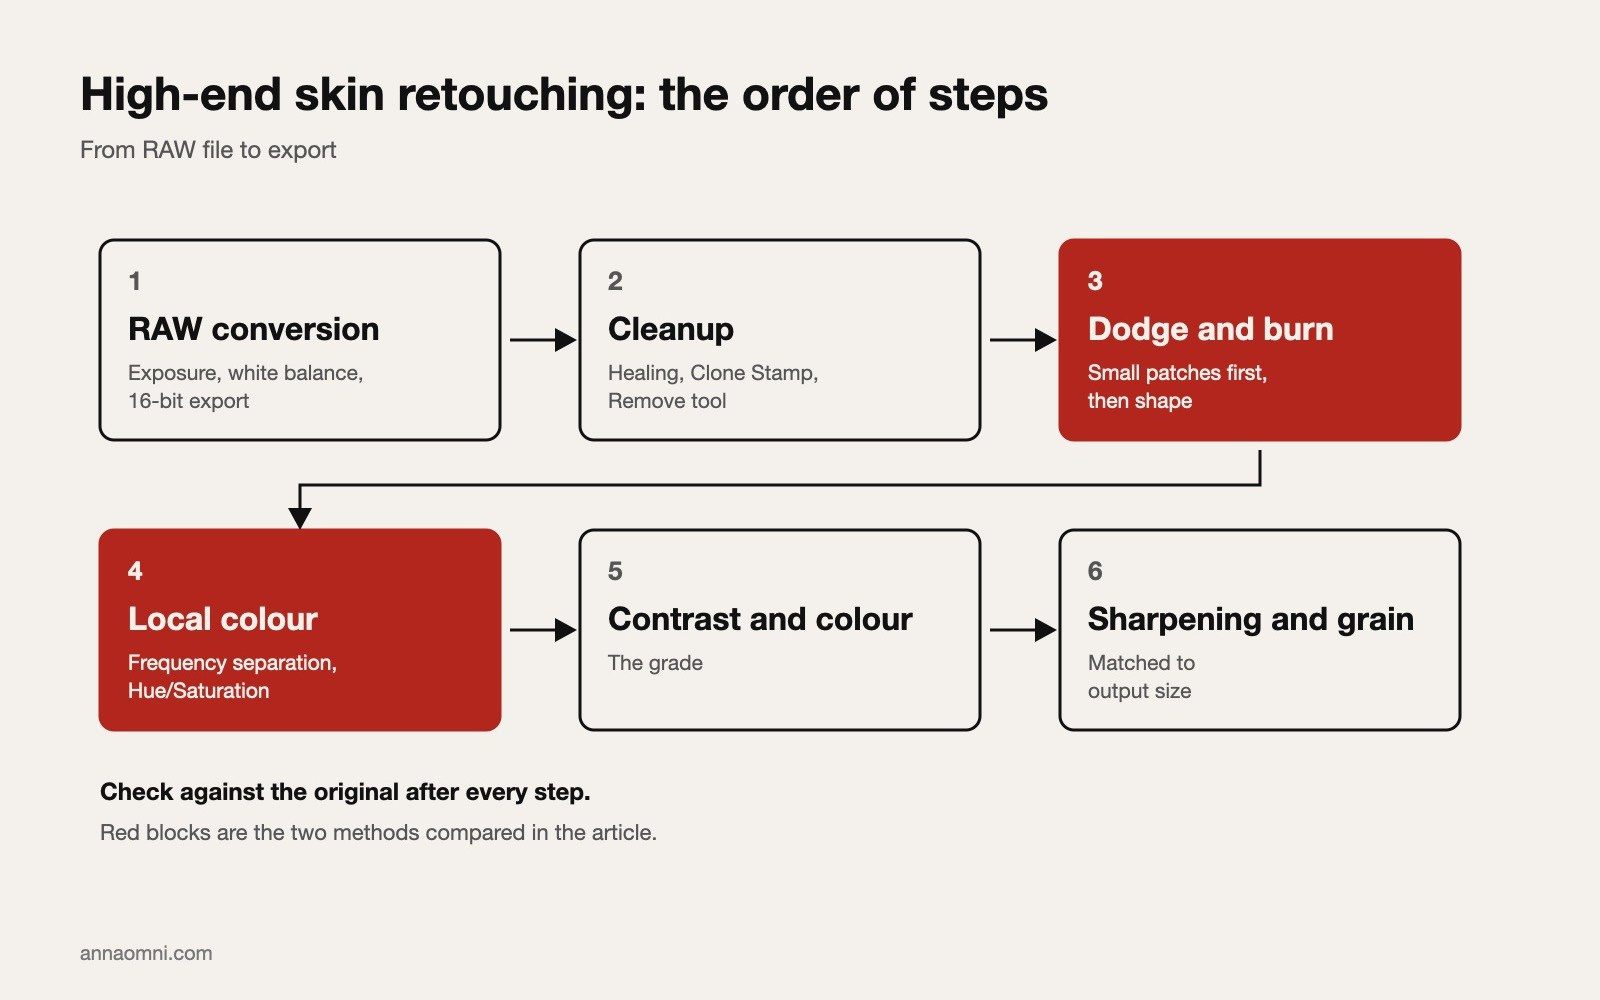
A high-end skin retouching workflow, in order
- RAW conversion. Exposure, white balance and base colour in Capture One or Adobe Camera Raw. Export a 16-bit file.
- Cleanup. Spot Healing Brush, Healing Brush, Clone Stamp and the Remove tool on an empty layer: spots, stray hairs, dust, lint on clothes.
- Dodge and burn. Small-scale first to even the skin, then large-scale to shape the face and body.
- Local colour. Redness, yellow patches, uneven tan. This is where frequency separation or a clipped Hue/Saturation layer does its job.
- Global contrast and colour. The grade.
- Sharpening and grain. Last, and matched to the output size.
Order matters. Cleanup first means you do not waste dodge and burn strokes on a spot that healing removes in one click.
Which method for which genre
- Beauty close-up. Skin fills the frame and may be printed large. Dodge and burn carries most of the work. Frequency separation only for local colour and shine.
- Fashion editorial. The face is smaller in the frame and the clothes matter as much as the skin. Careful cleanup, lighter dodge and burn, and frequency separation for a few patches is a common balance. It also helps on creased fabric.
- Catalogue and e-commerce. Volume and consistency come first. Cleanup, a quick frequency separation pass or an AI pass, and very little manual dodge and burn.
- Private portrait commissions. The person must still look like themselves. Cleanup plus light global dodge and burn. Keep moles, freckles and lines unless the client asks otherwise.
AI skin retouching vs manual
What the developers describe on their own pages:
- Retouch4me sells separate plug-ins, including Heal, Dodge & Burn and Skin Tone. Its Photoshop panel puts each operation on its own layer, so you can mask it or lower the opacity.
- Capture One has Retouch Faces, with sliders for Blemish, Dark Circles, Even Skin and Contouring, and an overall Impact control.
- Evoto offers blemish removal with separate controls for freckles and acne, plus skin smoothing.
- Luminar Neo has Skin AI and Face AI for skin smoothing, blemishes and facial features.
- Adobe Photoshop includes a Skin Smoothing Neural Filter. Adobe notes it works best on facial skin and less well on the neck and shoulders.
Where AI helps: large batches, catalogue work, proofs for client selection, and a base layer under manual retouching.
Where it falls short: it does not know the brief. It may remove a freckle or a scar the client wants to keep. It applies one idea of good skin to every frame, which is a problem in editorial work with a specific look. And a result baked into pixels gives you less control than a layer you painted yourself.
A sensible rule: let AI output land on a separate layer, reduce it, and finish by hand.
How long does it take?
Treat these as rough guides, not standards. Published tutorials and working retouchers describe roughly:
- Catalogue image: a few minutes.
- Editorial image: from about 45 minutes to two hours.
- Beauty close-up with full dodge and burn: one to three hours, sometimes much longer.
The numbers depend on the skin, the light, the make-up, the final size and the brief.
Common mistakes
- Starting dodge and burn before cleanup is finished.
- Working at 200–300% only and never zooming out.
- Leaving the check layers on and judging colour through them.
- Blurring the whole low layer.
- Painting with high flow and trying to fix it with the eraser.
- Removing all shadow under the eyes and around the nose.
Checklist before export
- Compared with the original at 100% and at fit-to-screen.
- Pores visible on the forehead, nose and cheeks.
- Shape of the face unchanged, unless the brief says otherwise.
- No halos along hair, jaw and clothing edges.
- Skin colour consistent between face, neck and hands.
- Check layers off.
- Viewed at final output size, or as a test print for large formats.
FAQ
Is frequency separation or dodge and burn better? Neither on its own. Dodge and burn is better for tone and shape, frequency separation for colour patches and local texture repairs. Most professional workflows use both.
Is frequency separation bad for skin? Only when the low layer is smoothed too much. Used on small areas with a sensible radius, it is a normal professional tool.
When should you use dodge and burn? After cleanup. Use it to even small light and dark patches, and then to shape the face, body and clothes with light.
Should I work in 8-bit or 16-bit? 16-bit is safer for skin gradients. Remember that the Apply Image settings for frequency separation differ: Subtract with Offset 128 for 8-bit, Add with Invert and Offset 0 for 16-bit.
Can AI replace manual skin retouching? For volume work it often can. For beauty close-ups and editorial work it is a starting point that still needs a person to decide what stays.
Photoshop steps and software features were checked against Adobe’s and the developers' own pages in November 2026. Tools change; confirm the current version before you buy or update.
Want feedback on your retouching or help building a workflow? See mentorship or book a consultation.